
No-secret and no-token deployments to Databricks from Azure DevOps
Secure, hassle-free, and robust deployments for your Databricks jobs. What's not to like?

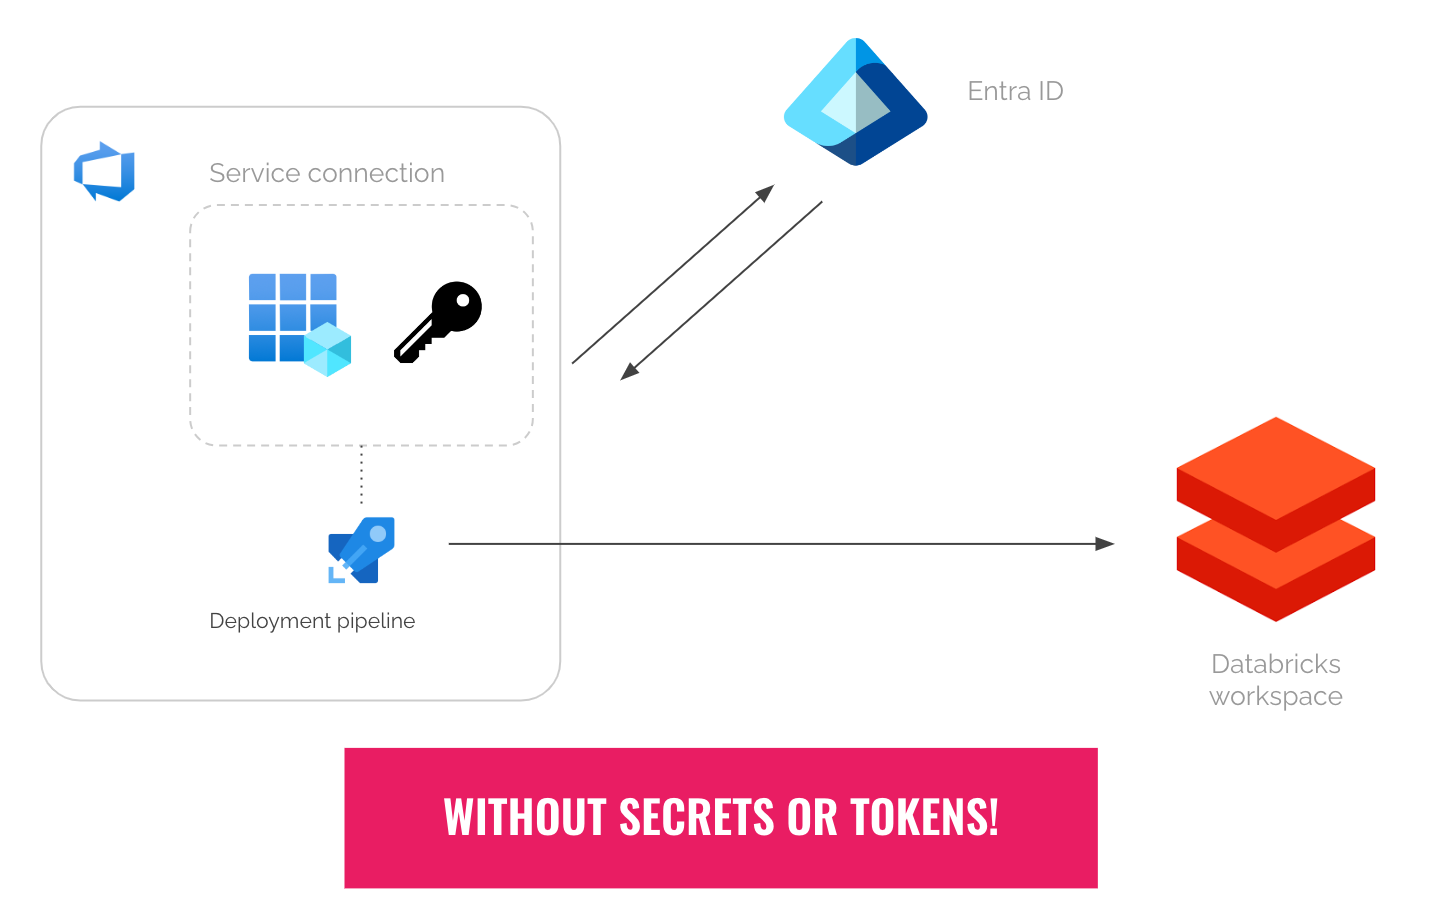
If you’ve been using Azure DevOps to securely deploy your code to Azure Databricks, you know you need service connections for your deployment pipelines. Without it, you will need to put your credentials (secrets or tokens) in plain text.
And that’s far from ideal ideal.
To create service connections to Azure, Entra ID service principals are typically used. When doing so, you need to supply the ID of a service principal and its secret once. The id and secret will be stored in Azure DevOps, for future reuse by your deployment pipelines.
But there’s a huge risk of using service principal secrets: If the secret expires, or gets rotated without updating it in Azure DevOps, then your deployment pipelines will break. The persisted secret also becomes a security risk if it gets leaked or exfiltrated, because it can be used anywhere.
In the past, the only way to avoid using secrets was to replace the service principals with managed identities and self-hosted agents. While to many this seems to be an acceptable solution, some may find this solution costly: Azure VMs have running costs.
So, are there any secure and hassle-free alternatives?
Luckily now there is one. In late 2023, Microsoft introduced Azure DevOps workload identity federation. I know it sounds mouthful, but you’ll find it very useful.
Here’s how it works.
How Azure DevOps Workload Identity Federation works
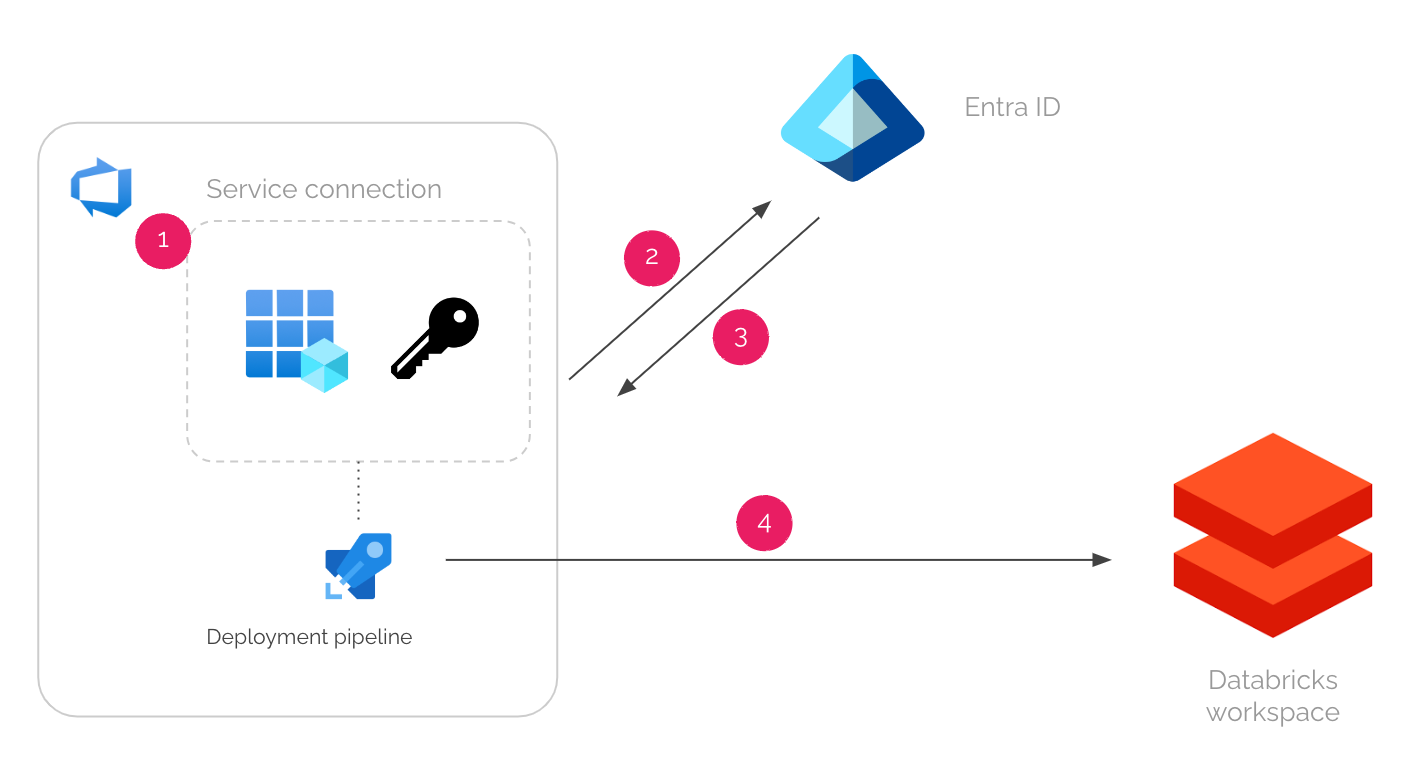
Behind the scenes, Azure DevOps and Entra ID collaborates to do the following steps.
When a pipeline job runs in Azure DevOps, it gets a short-lived OpenID Connect (OIDC) token from Azure DevOps.
This token is scoped to the service connection that the pipeline uses.
The pipeline job then sends the OIDC token to Entra ID.
Entra ID verifies the token and returns another short-lived Azure access token.
For this step to work, you need to do some pre-configurations to make both parties know each other — which I will explain in the following guide.
The pipeline job can now use the Azure access token to authenticate to Azure services, such as Azure Databricks.
On the side, the service principal or managed identity needs to be given enough permissions for deployment in the Azure services beforehand.
As you can see, the improved security and lack of hassle come from 2 conditions:
The limited scope of the token. The Azure DevOps OIDC token is scoped to a service connection.
The lifetime of the tokens. Both Azure DevOps and Entra ID tokens are short-lived (1 hour by default).
Can’t wait to start using this for your code deployments to Databricks?
Let’s jump in.
What you need
Before setting things up, let’s make sure you have all the necessary ingredients.
In this guide, I will use a user-assigned managed identity instead of Entra ID service principal. You can also use service principals for this purpose, but in many cases, engineers don’t have the privilege to create them in Entra ID.
An Azure user-assigned managed identity.
You will need the permission to create federated credentials in the identity.
If you don’t have it, ask the ones with Owner, Contributor, or Managed Identity Contributor role to do some of the step in this guide for you.
The identity will need a Reader role in the subscription where your Databricks workspace is.
If it doesn’t have the role in that scope, ask your subscription owner to grant it.
An Azure DevOps project.
You need the Project Administrators role of to create service connections.
If you don’t have it, ask the one with that role to do some of the steps in this guide for you.
An Azure Databricks workspace.
You will need the permission to register a service principal / managed identity to the workspace.
If you don’t have it, ask your workspace admin to do some of the steps in this guide for you.
Azure DevOps workload identity federation (WIF) setup guide
Before you start, I suggest you have 3 browser tabs open:
1 for your Databricks workspace
1 for your managed identity’s page in Azure Portal
1 for your Azure DevOps
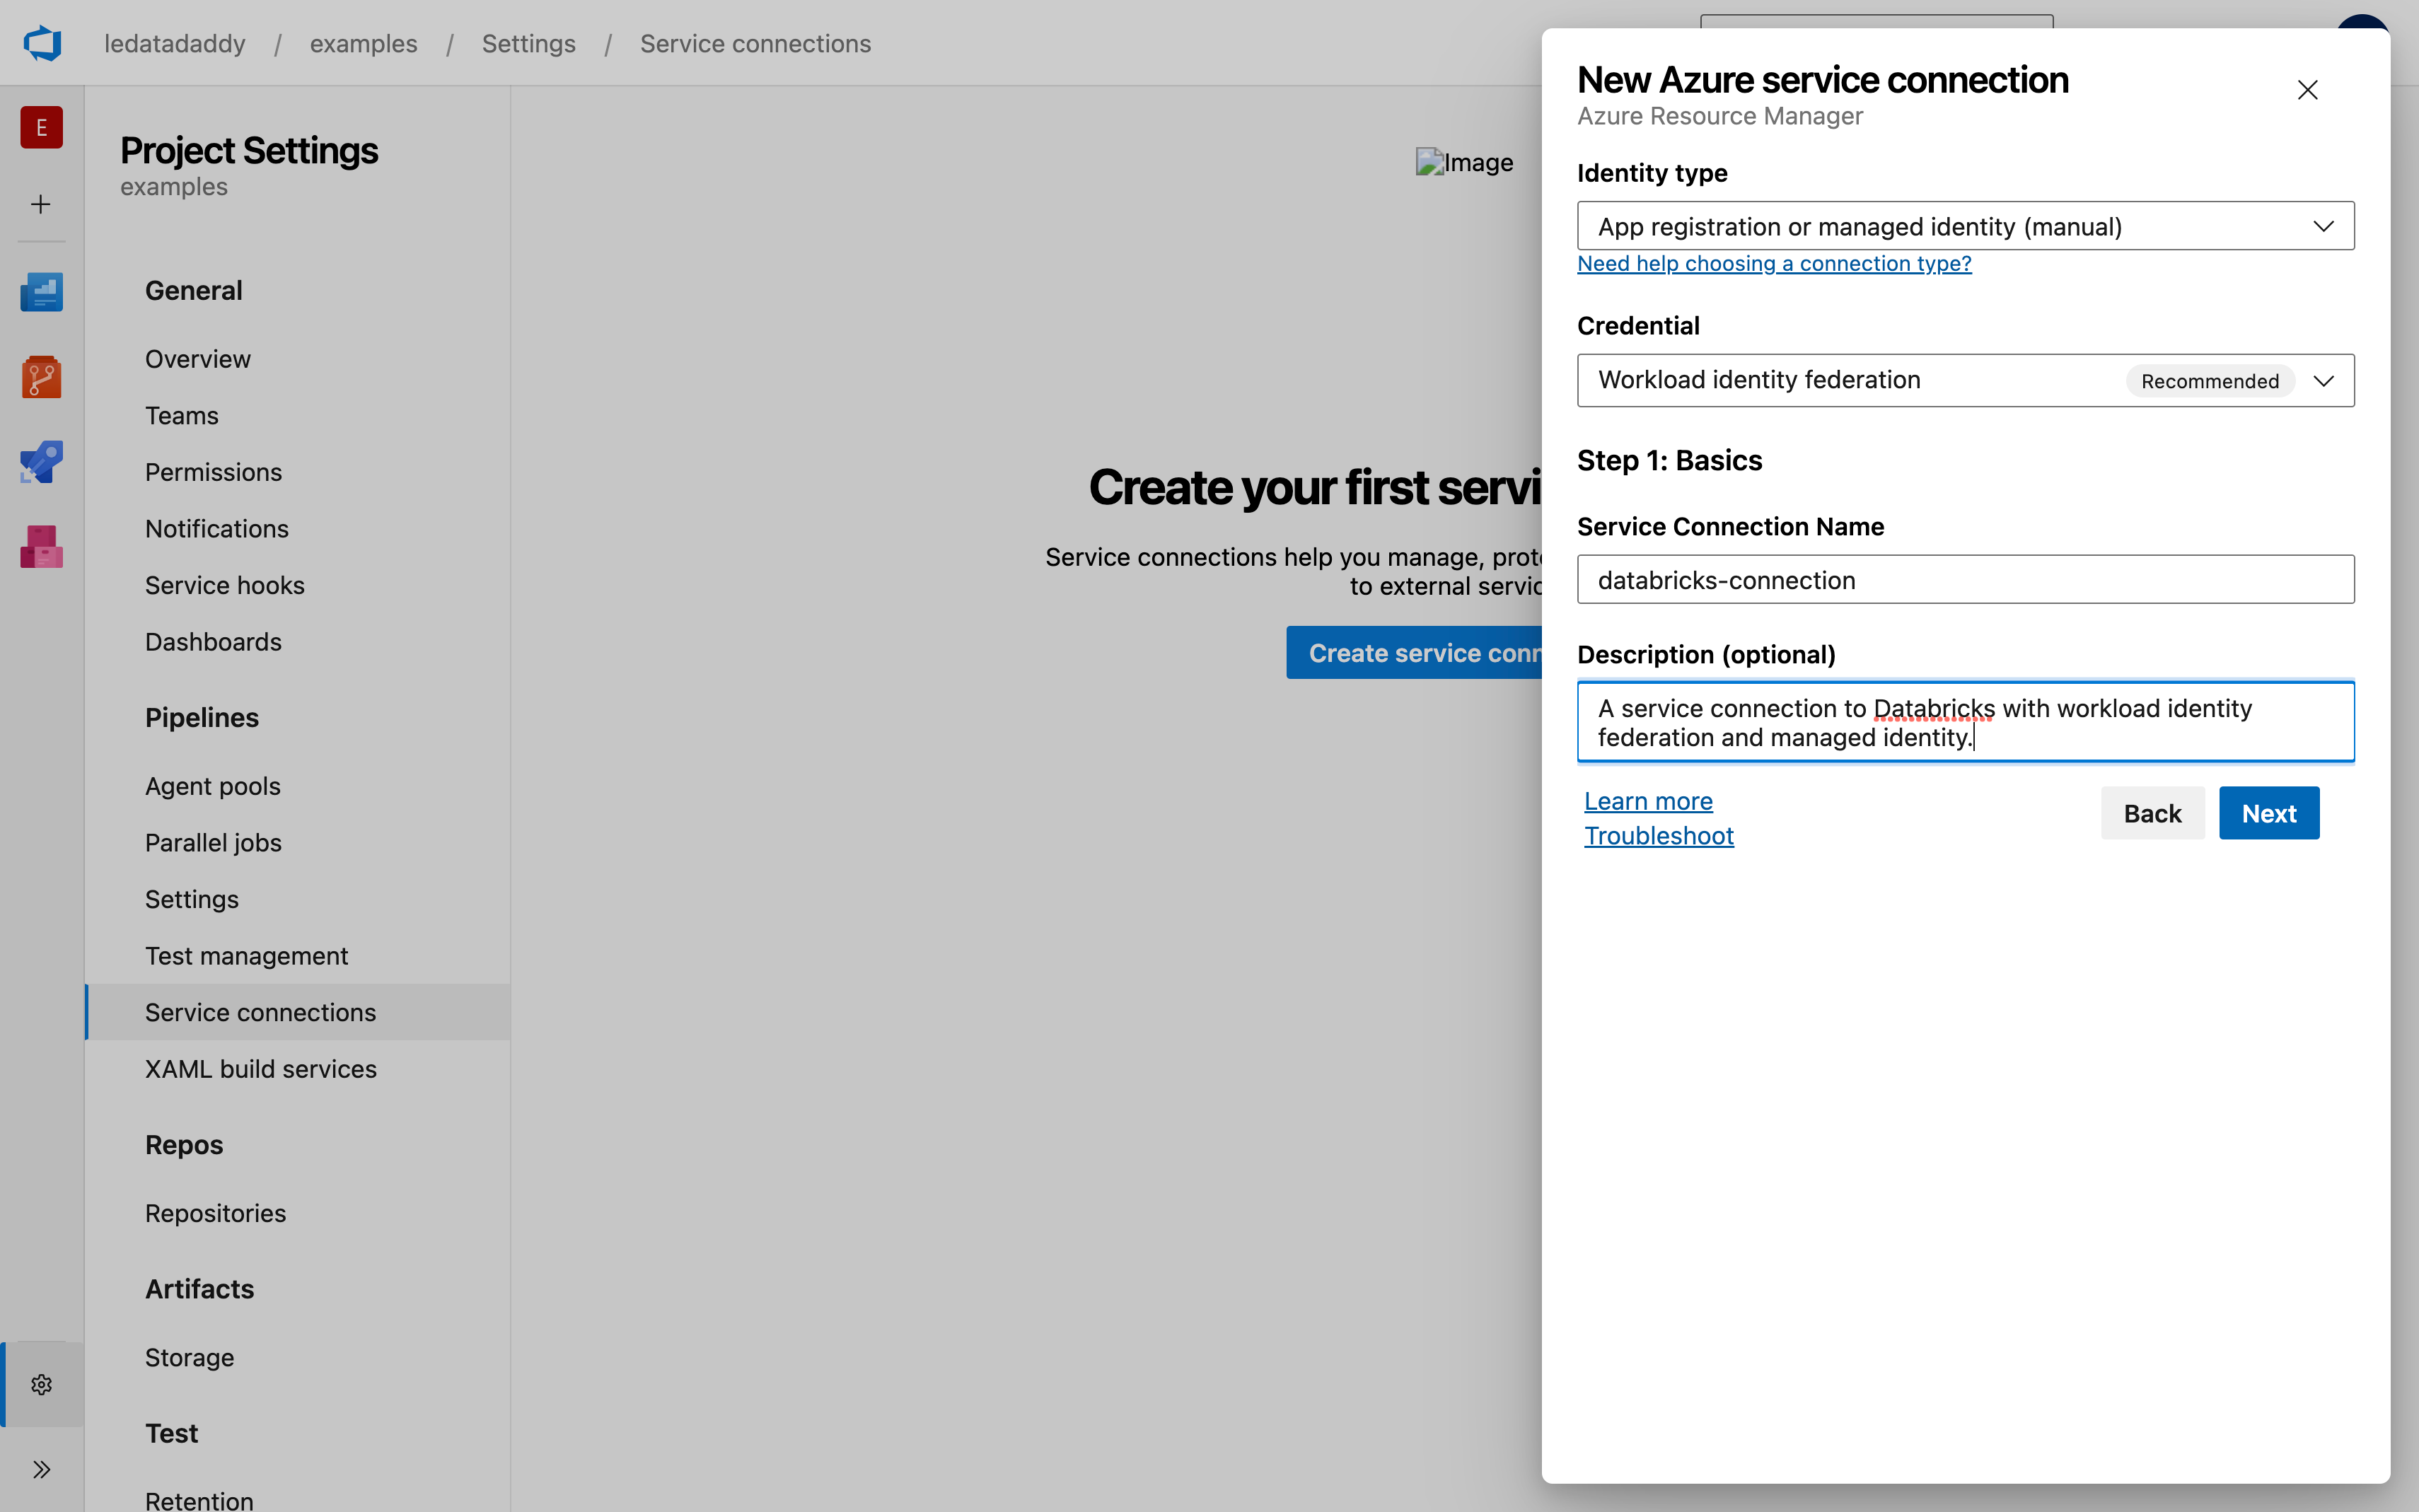
Step 1: Initiate a service connection with workload identity in Azure DevOps
In your Azure DevOps project, do the following:
Go to Project Settings > Service Connections.
Select New service connection > Azure Resource Manager.

Choose App registration or managed identity (manual).
Choose Workload identity federation (recommended).
Give it a name and meaningful description. Remember the name for your pipeline.
Click Next.
Fill in the Subscription ID and Subscription name using the values from your managed identity’s overview page in Azure Portal.
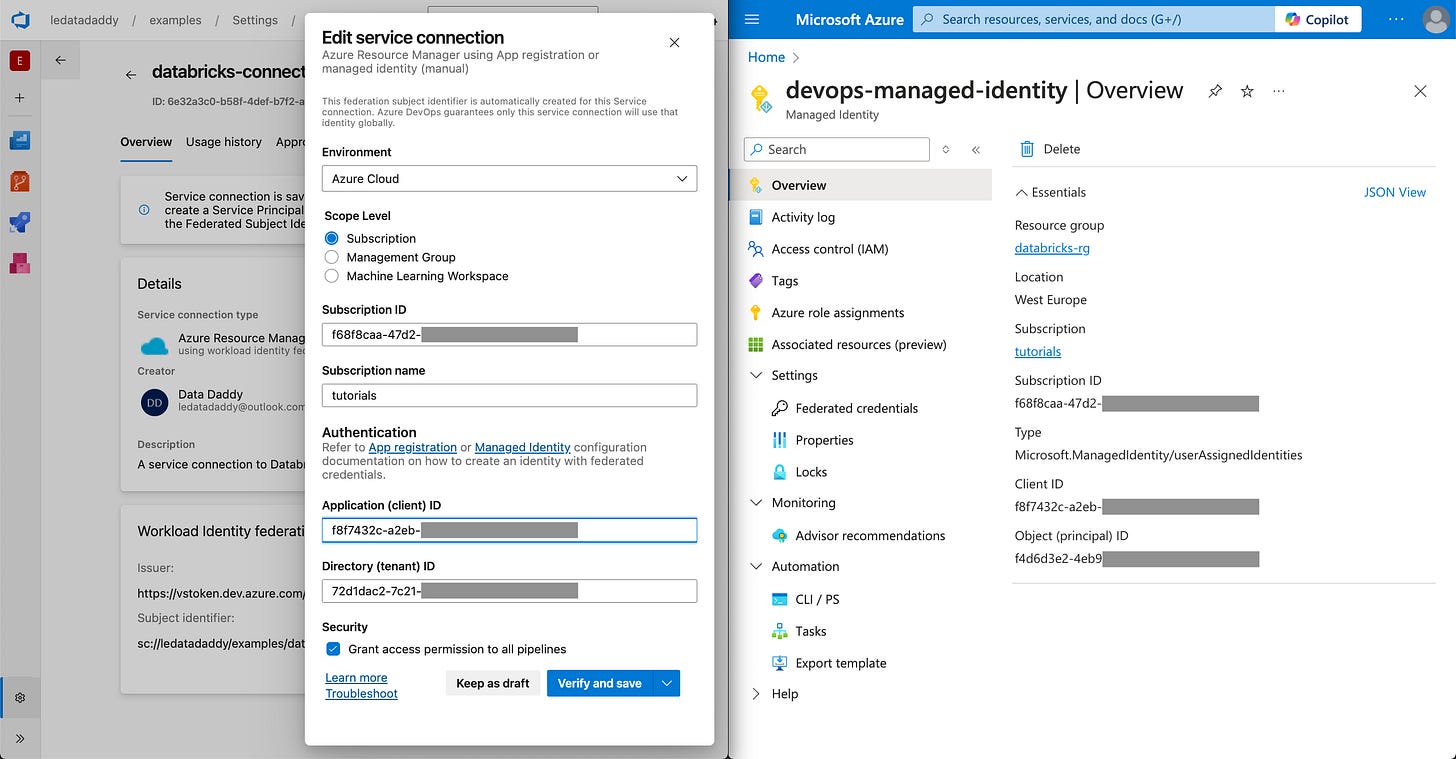
Notice the 2 values here for step 2.
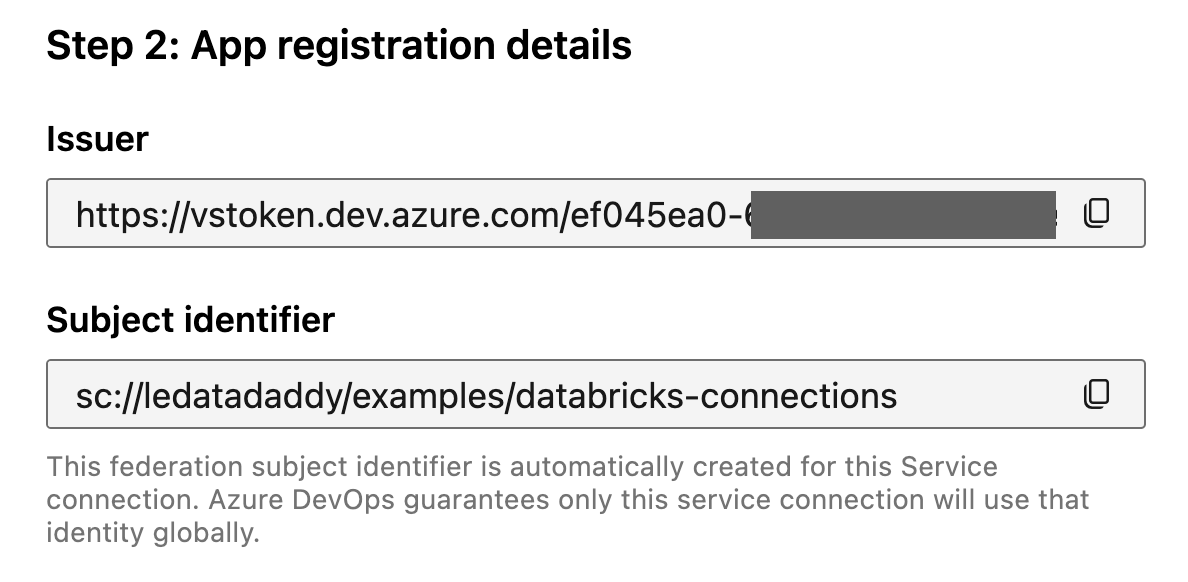
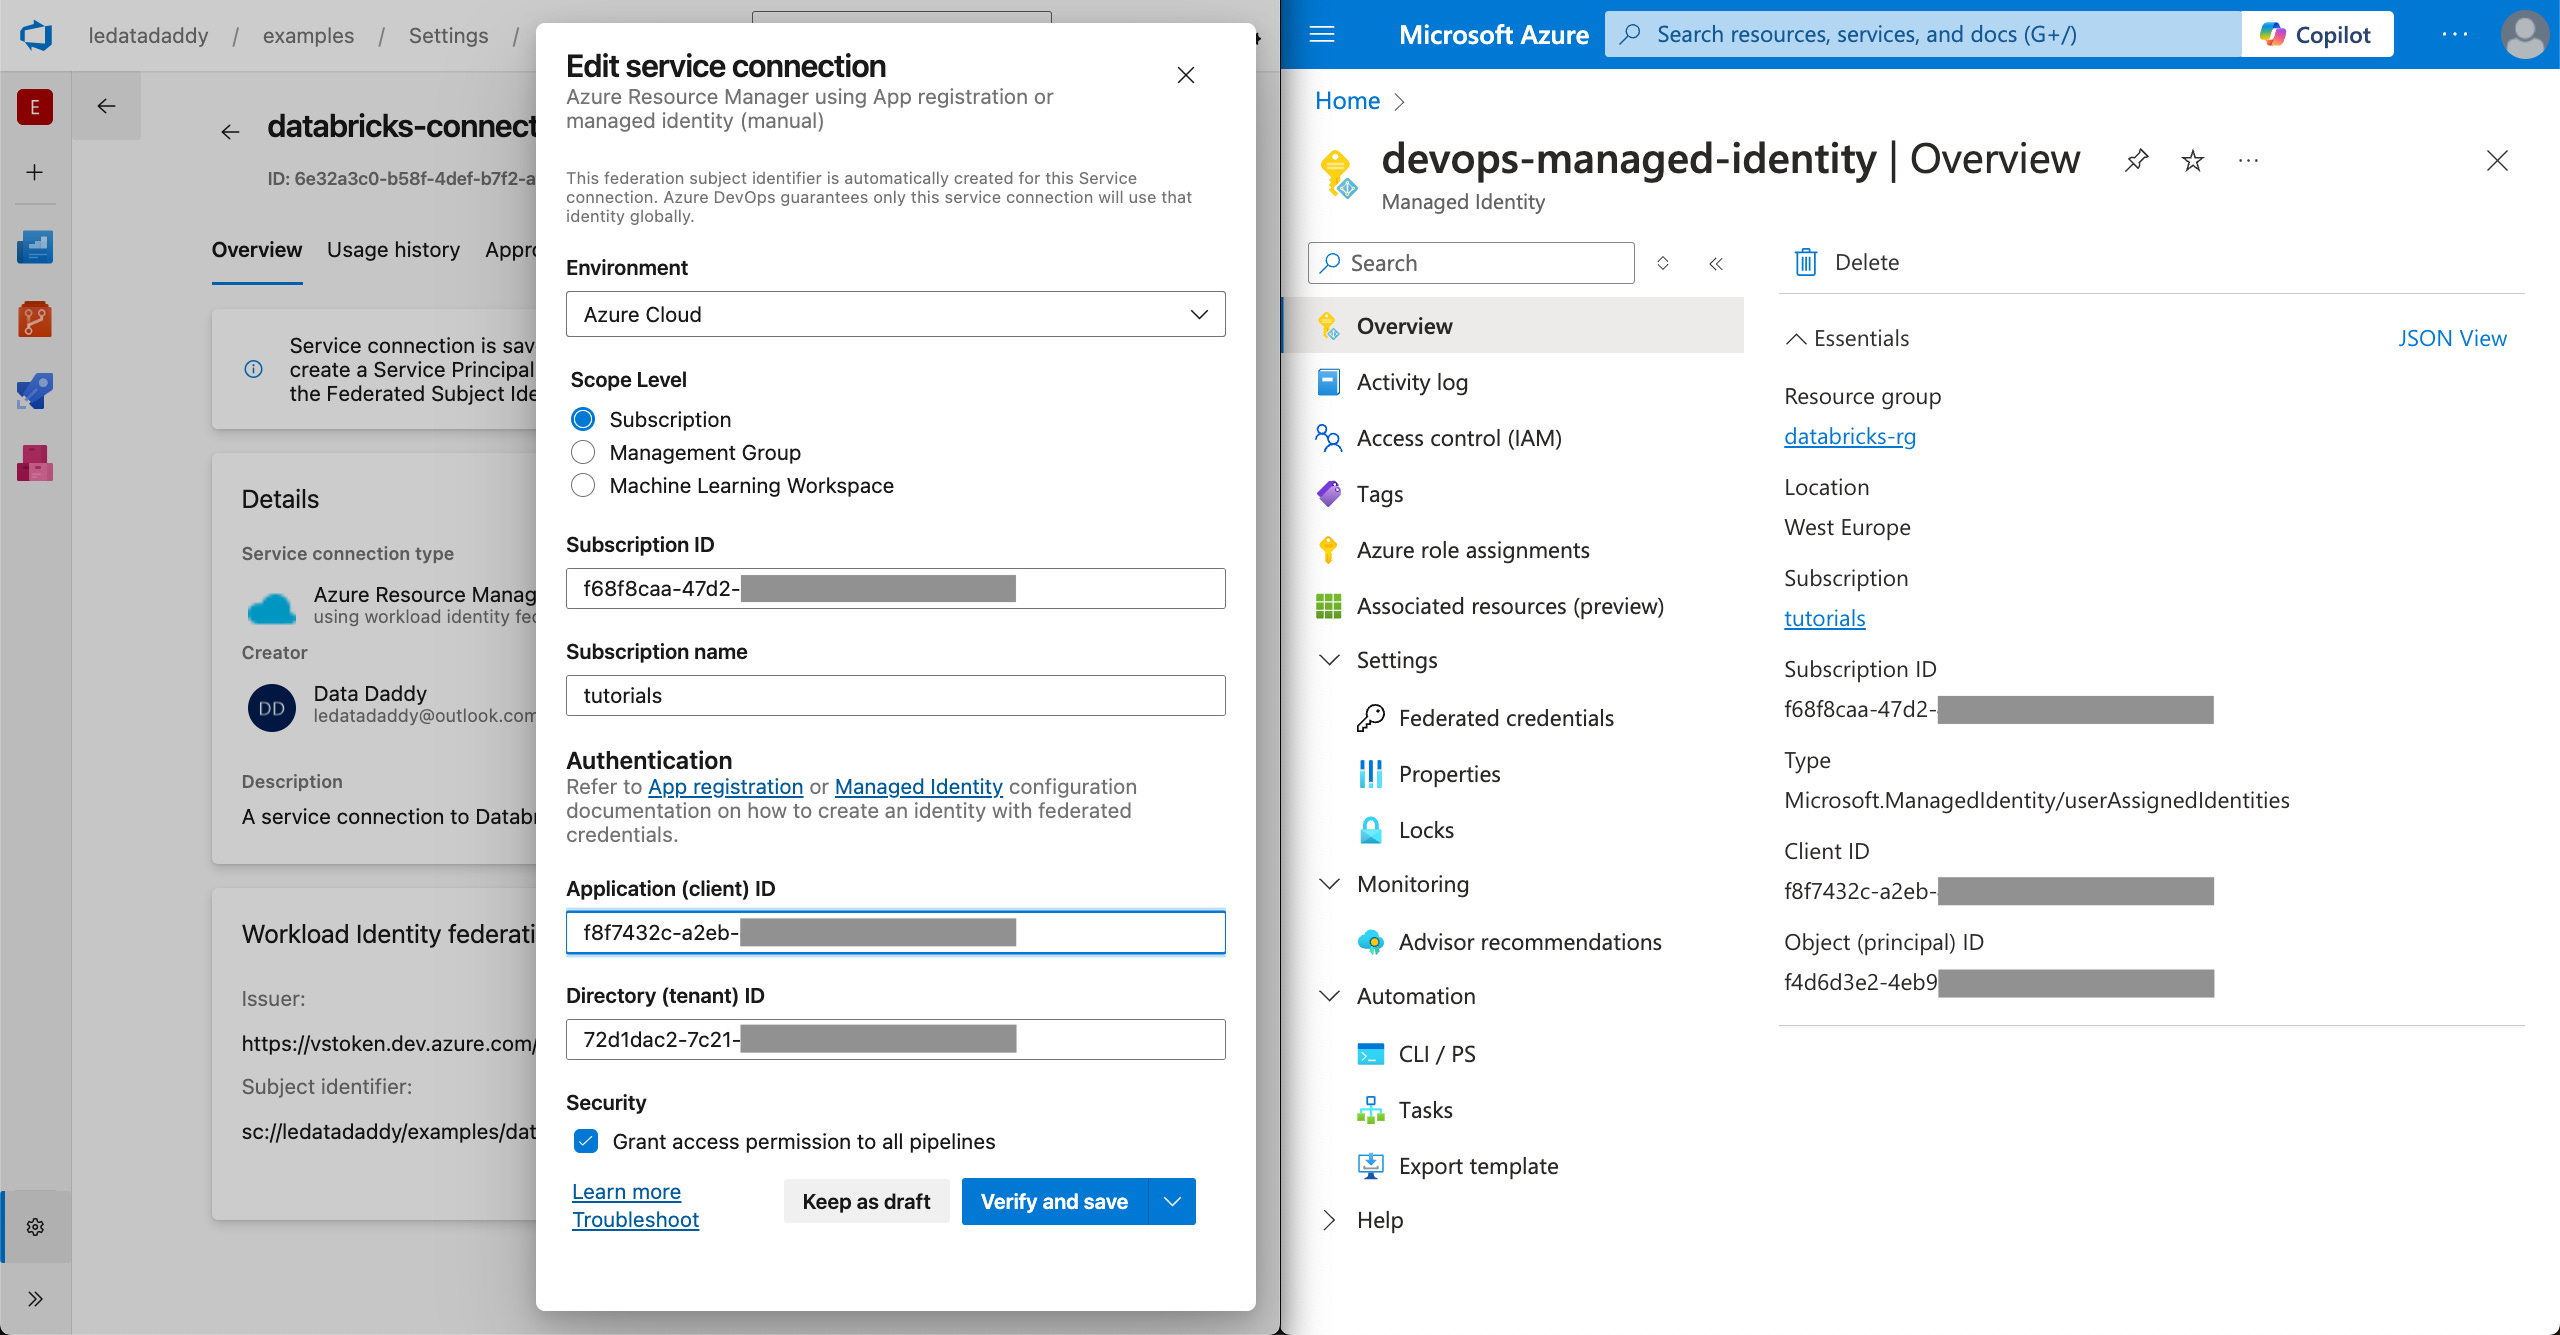

Step 2: Add a federated credential in the managed identity
This is the step that links your Azure DevOps service connection and Entra ID, and the one that makes the workload identity federation magic work.
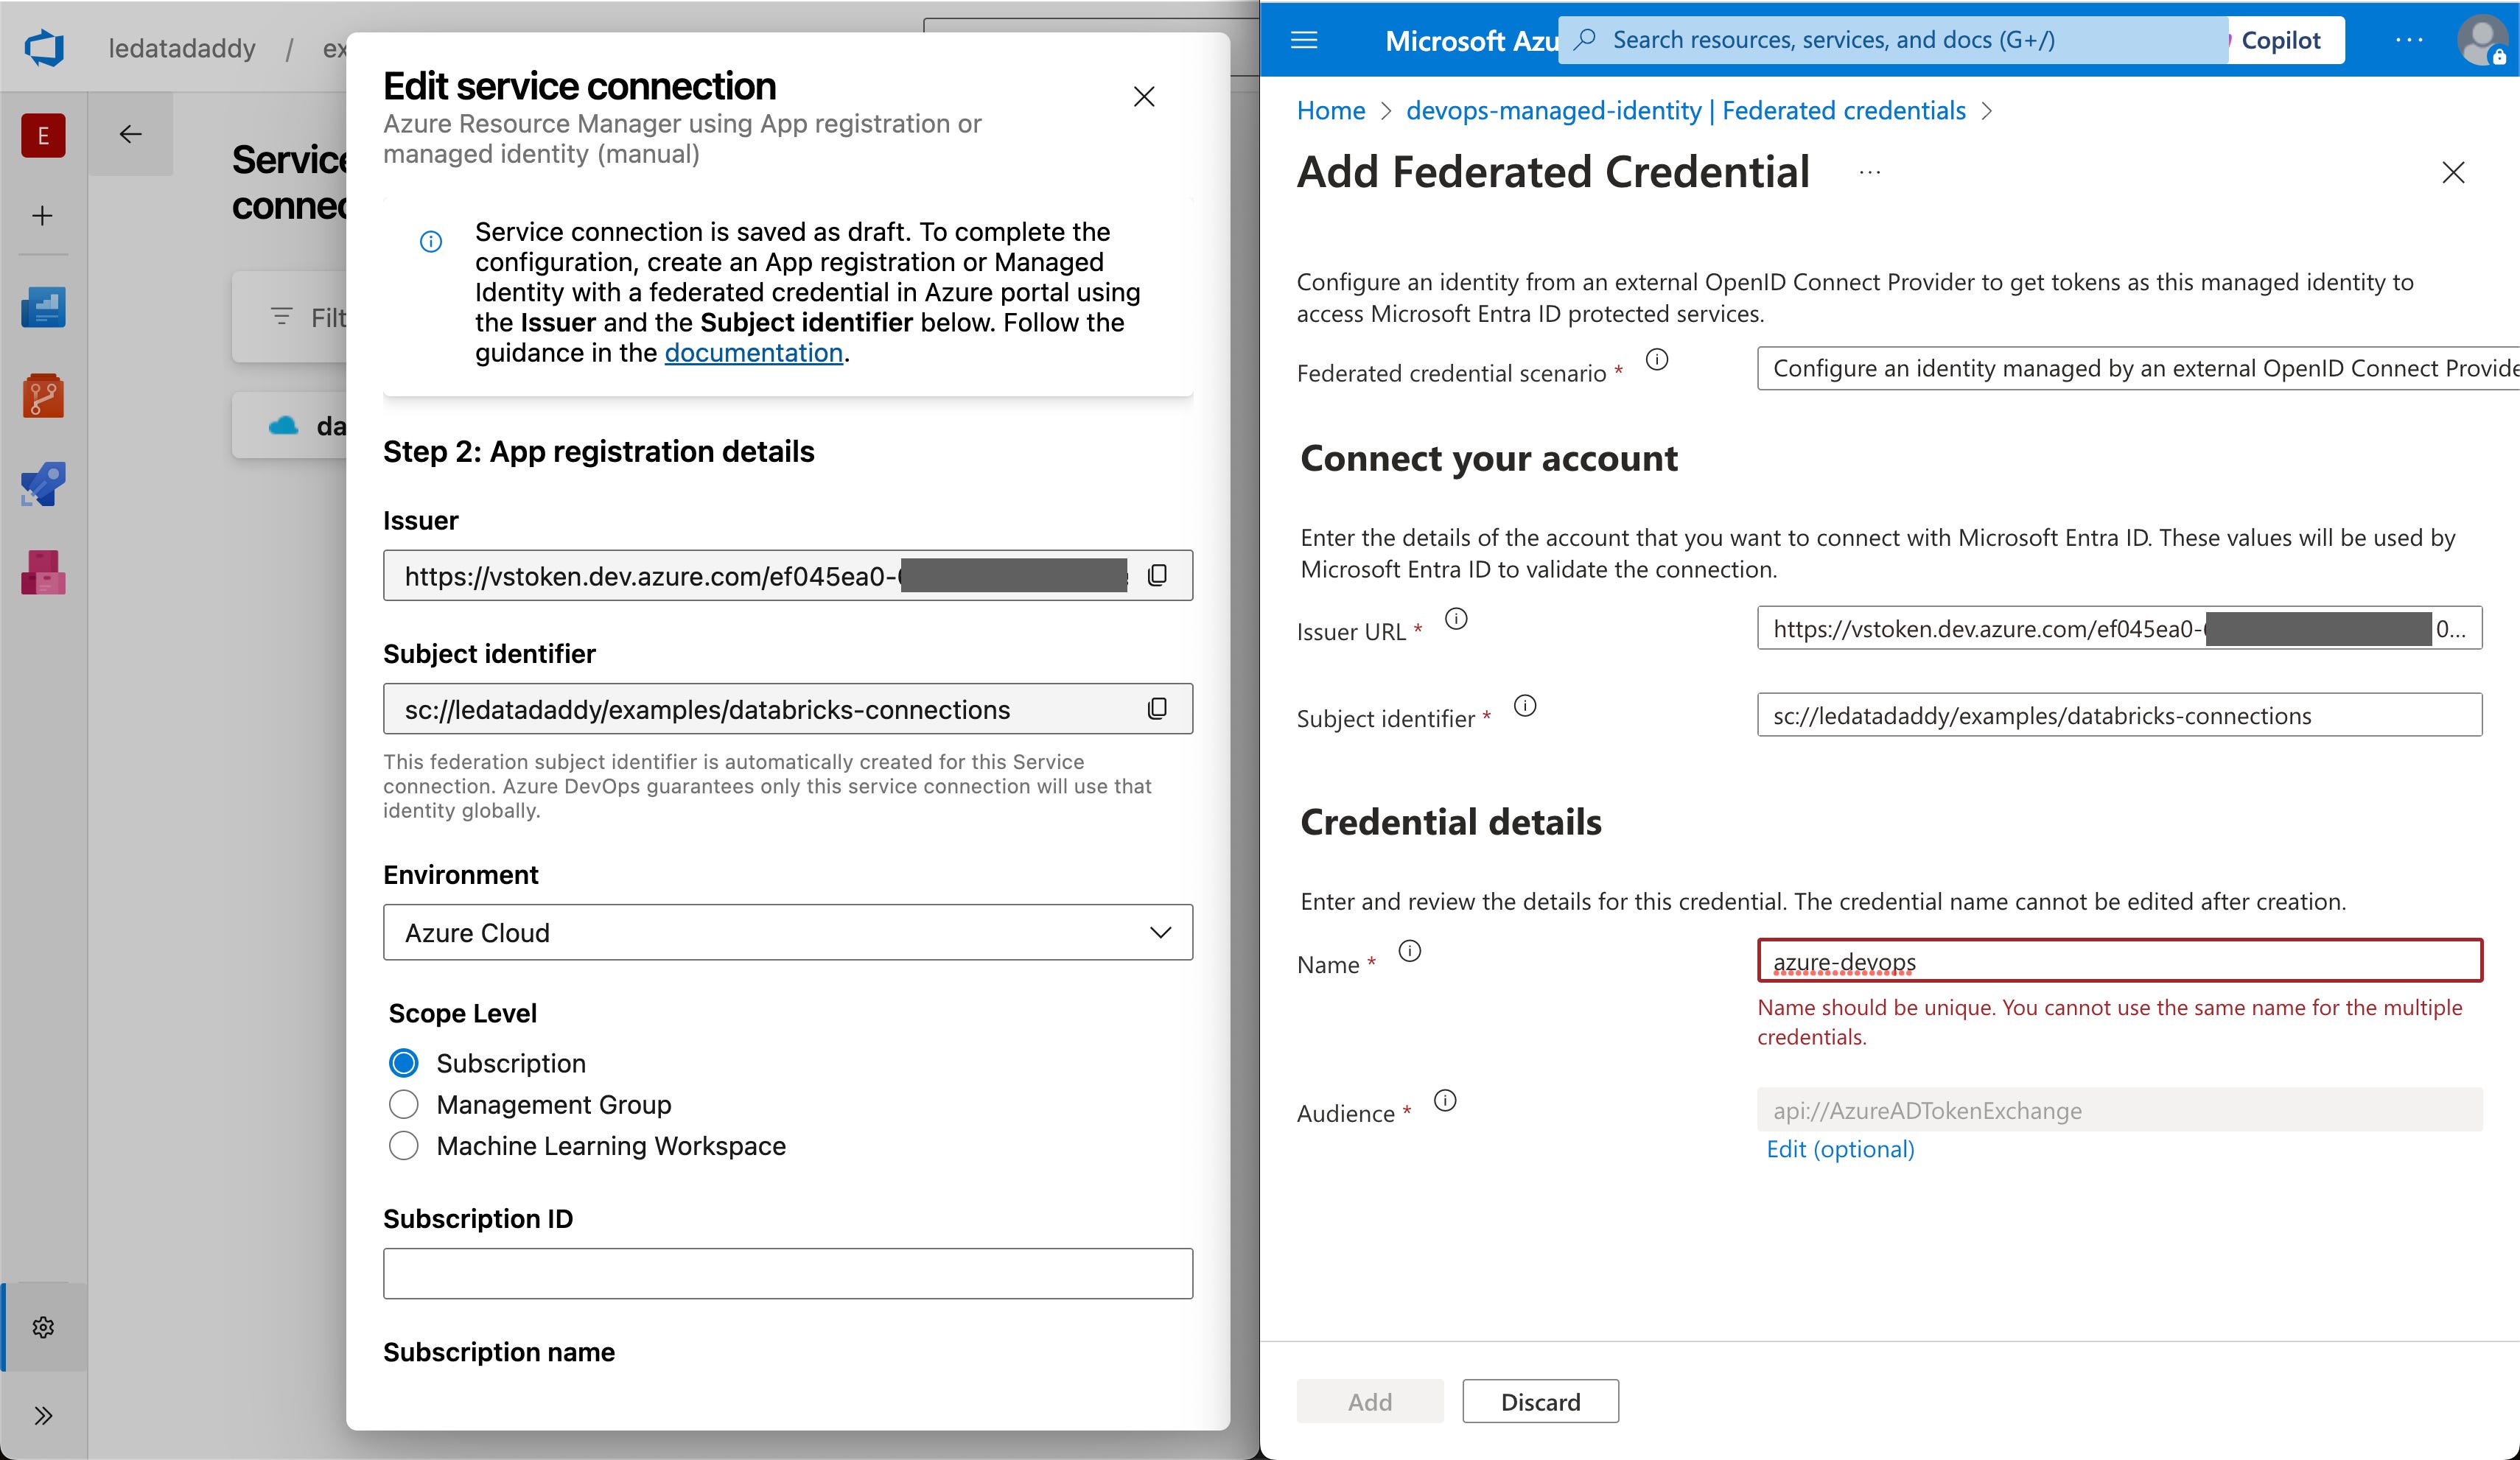
Use browser tab that has your managed identity page open, to do the following:
Go to Settings > Federated Credentials page.
Click the Add Credential button.
In the newly opened blade, choose the Other federated credential scenario.
Copy the values from Azure DevOps:
(Service Connection) Issuer —> (Federated Credential) Issuer URL.
(Service Connection) Subject identifier —> (Federated Credential) Subject identifier.
Notice that there’s no secret being exchanged. If the Issuer or Subject identifier values get leaked, they can’t be used to authenticate to Azure DevOps or Entra ID.
It will be difficult to use them to create a token either — without access to the private key (or the ability to sign a valid JWT from the Azure DevOps), the token request will be denied.
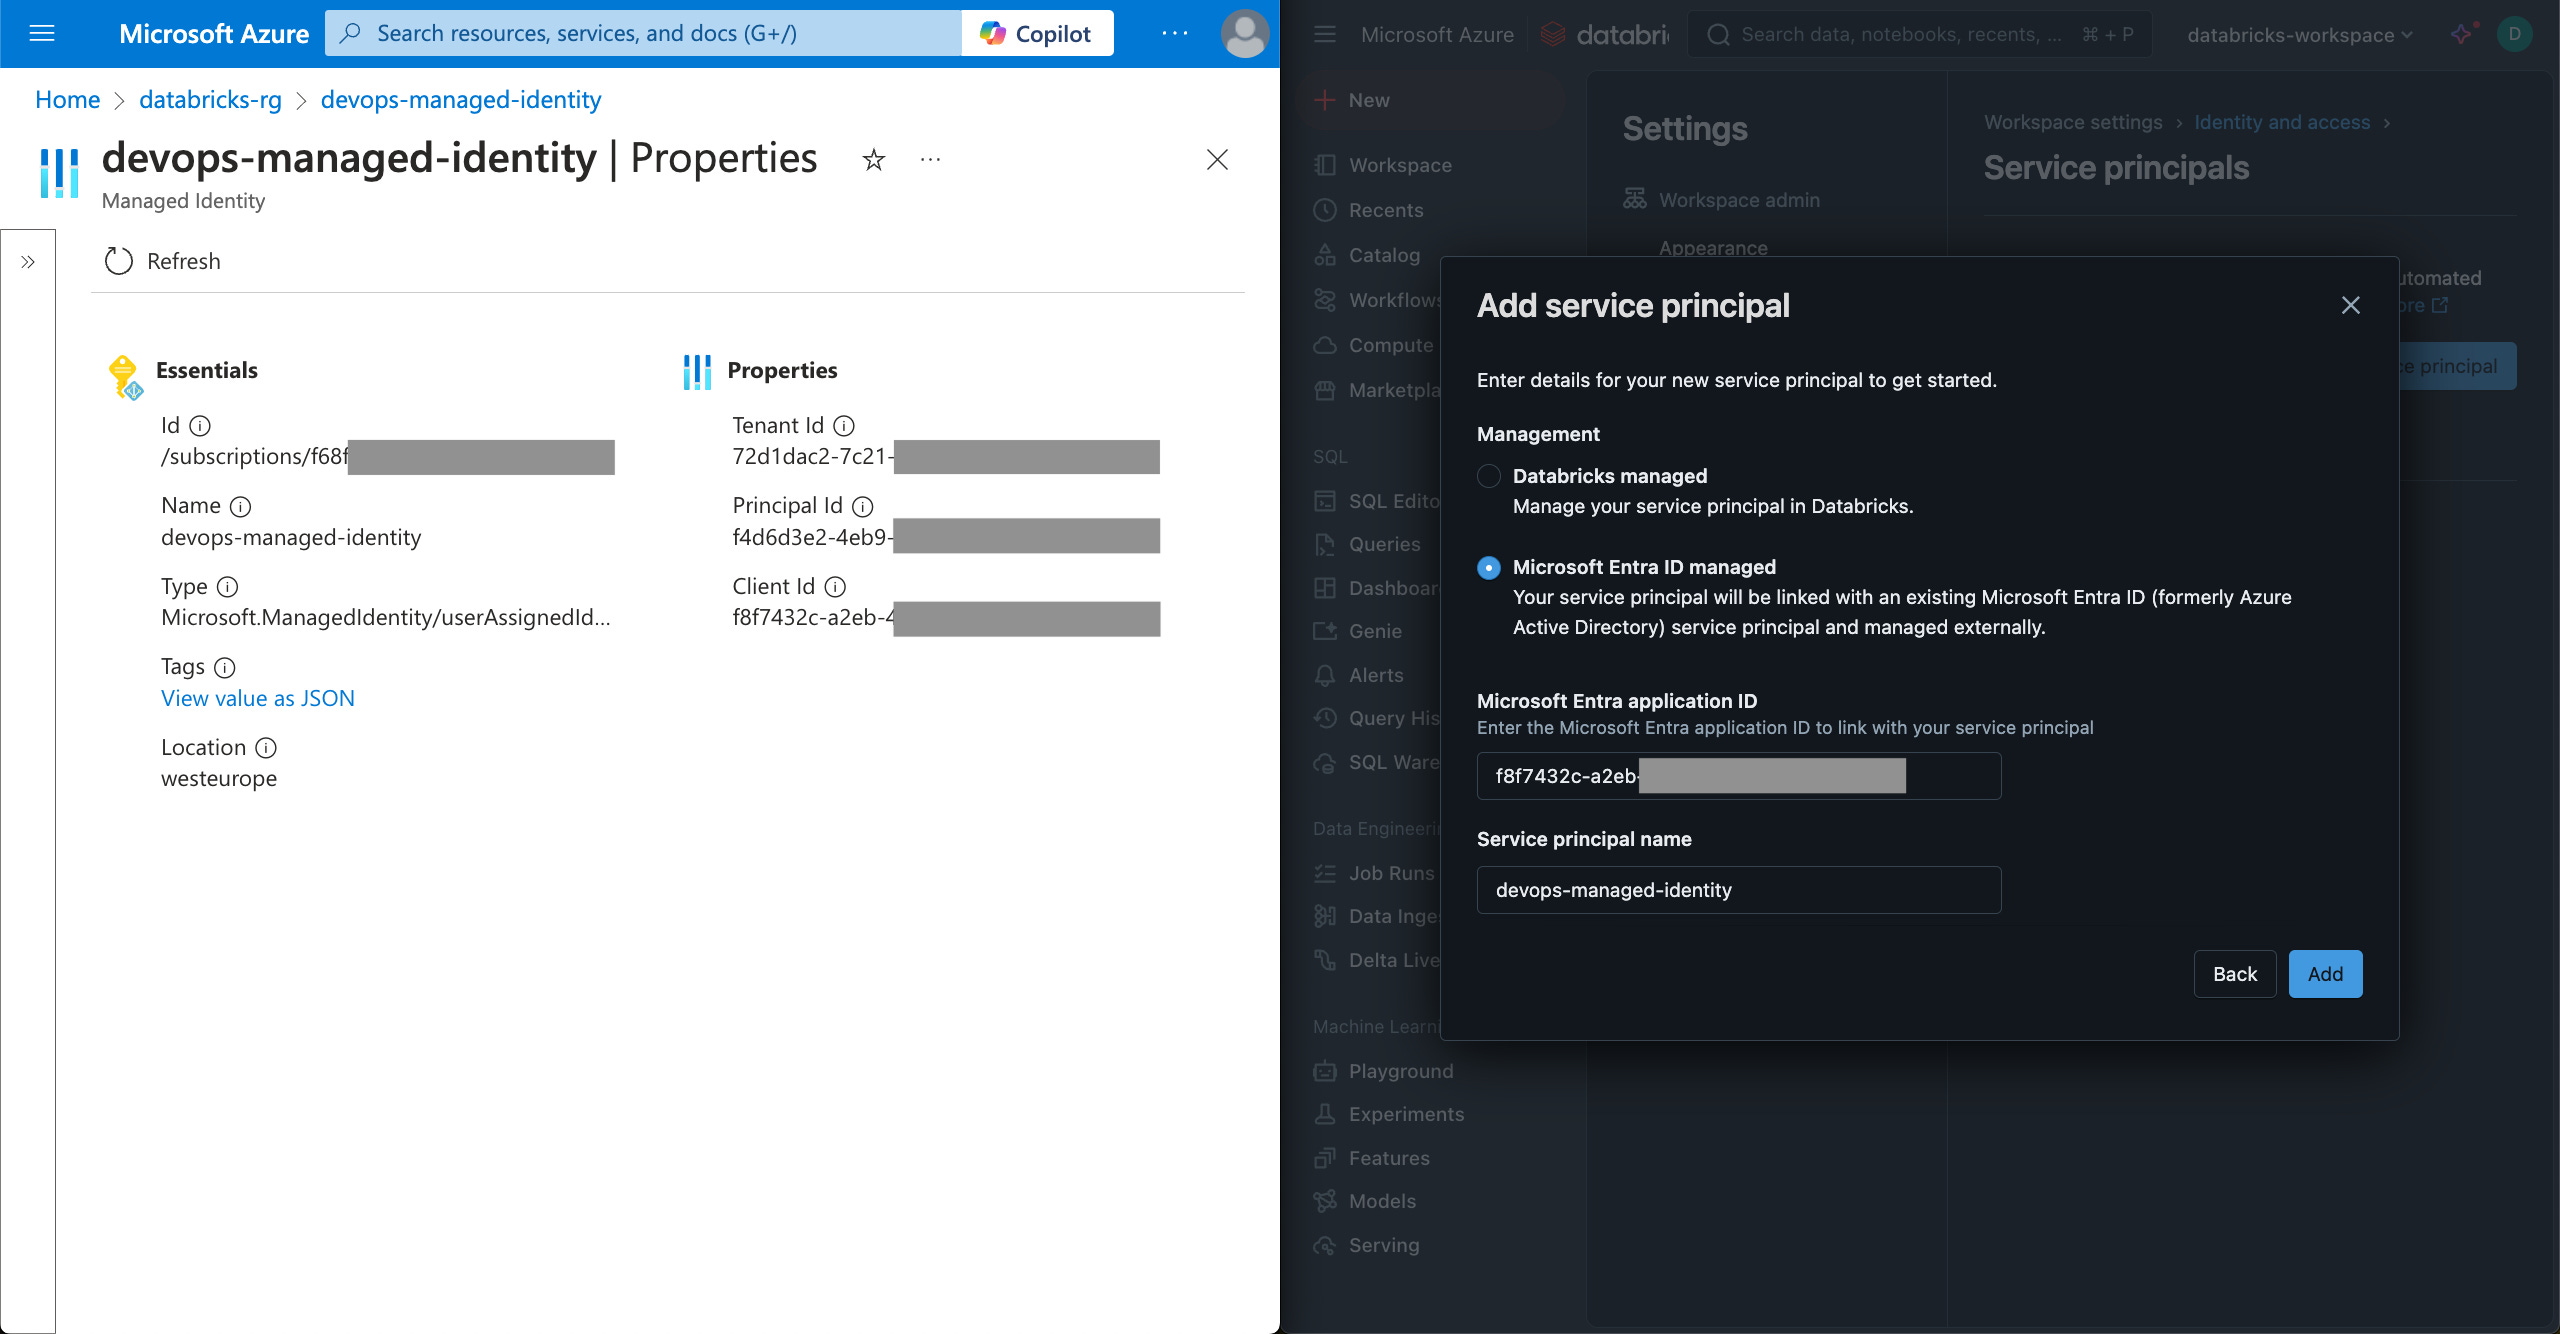
Step 3: Add the managed identity to the Databricks workspace
This is the step that allows the managed identity to deploy a job in Databricks.
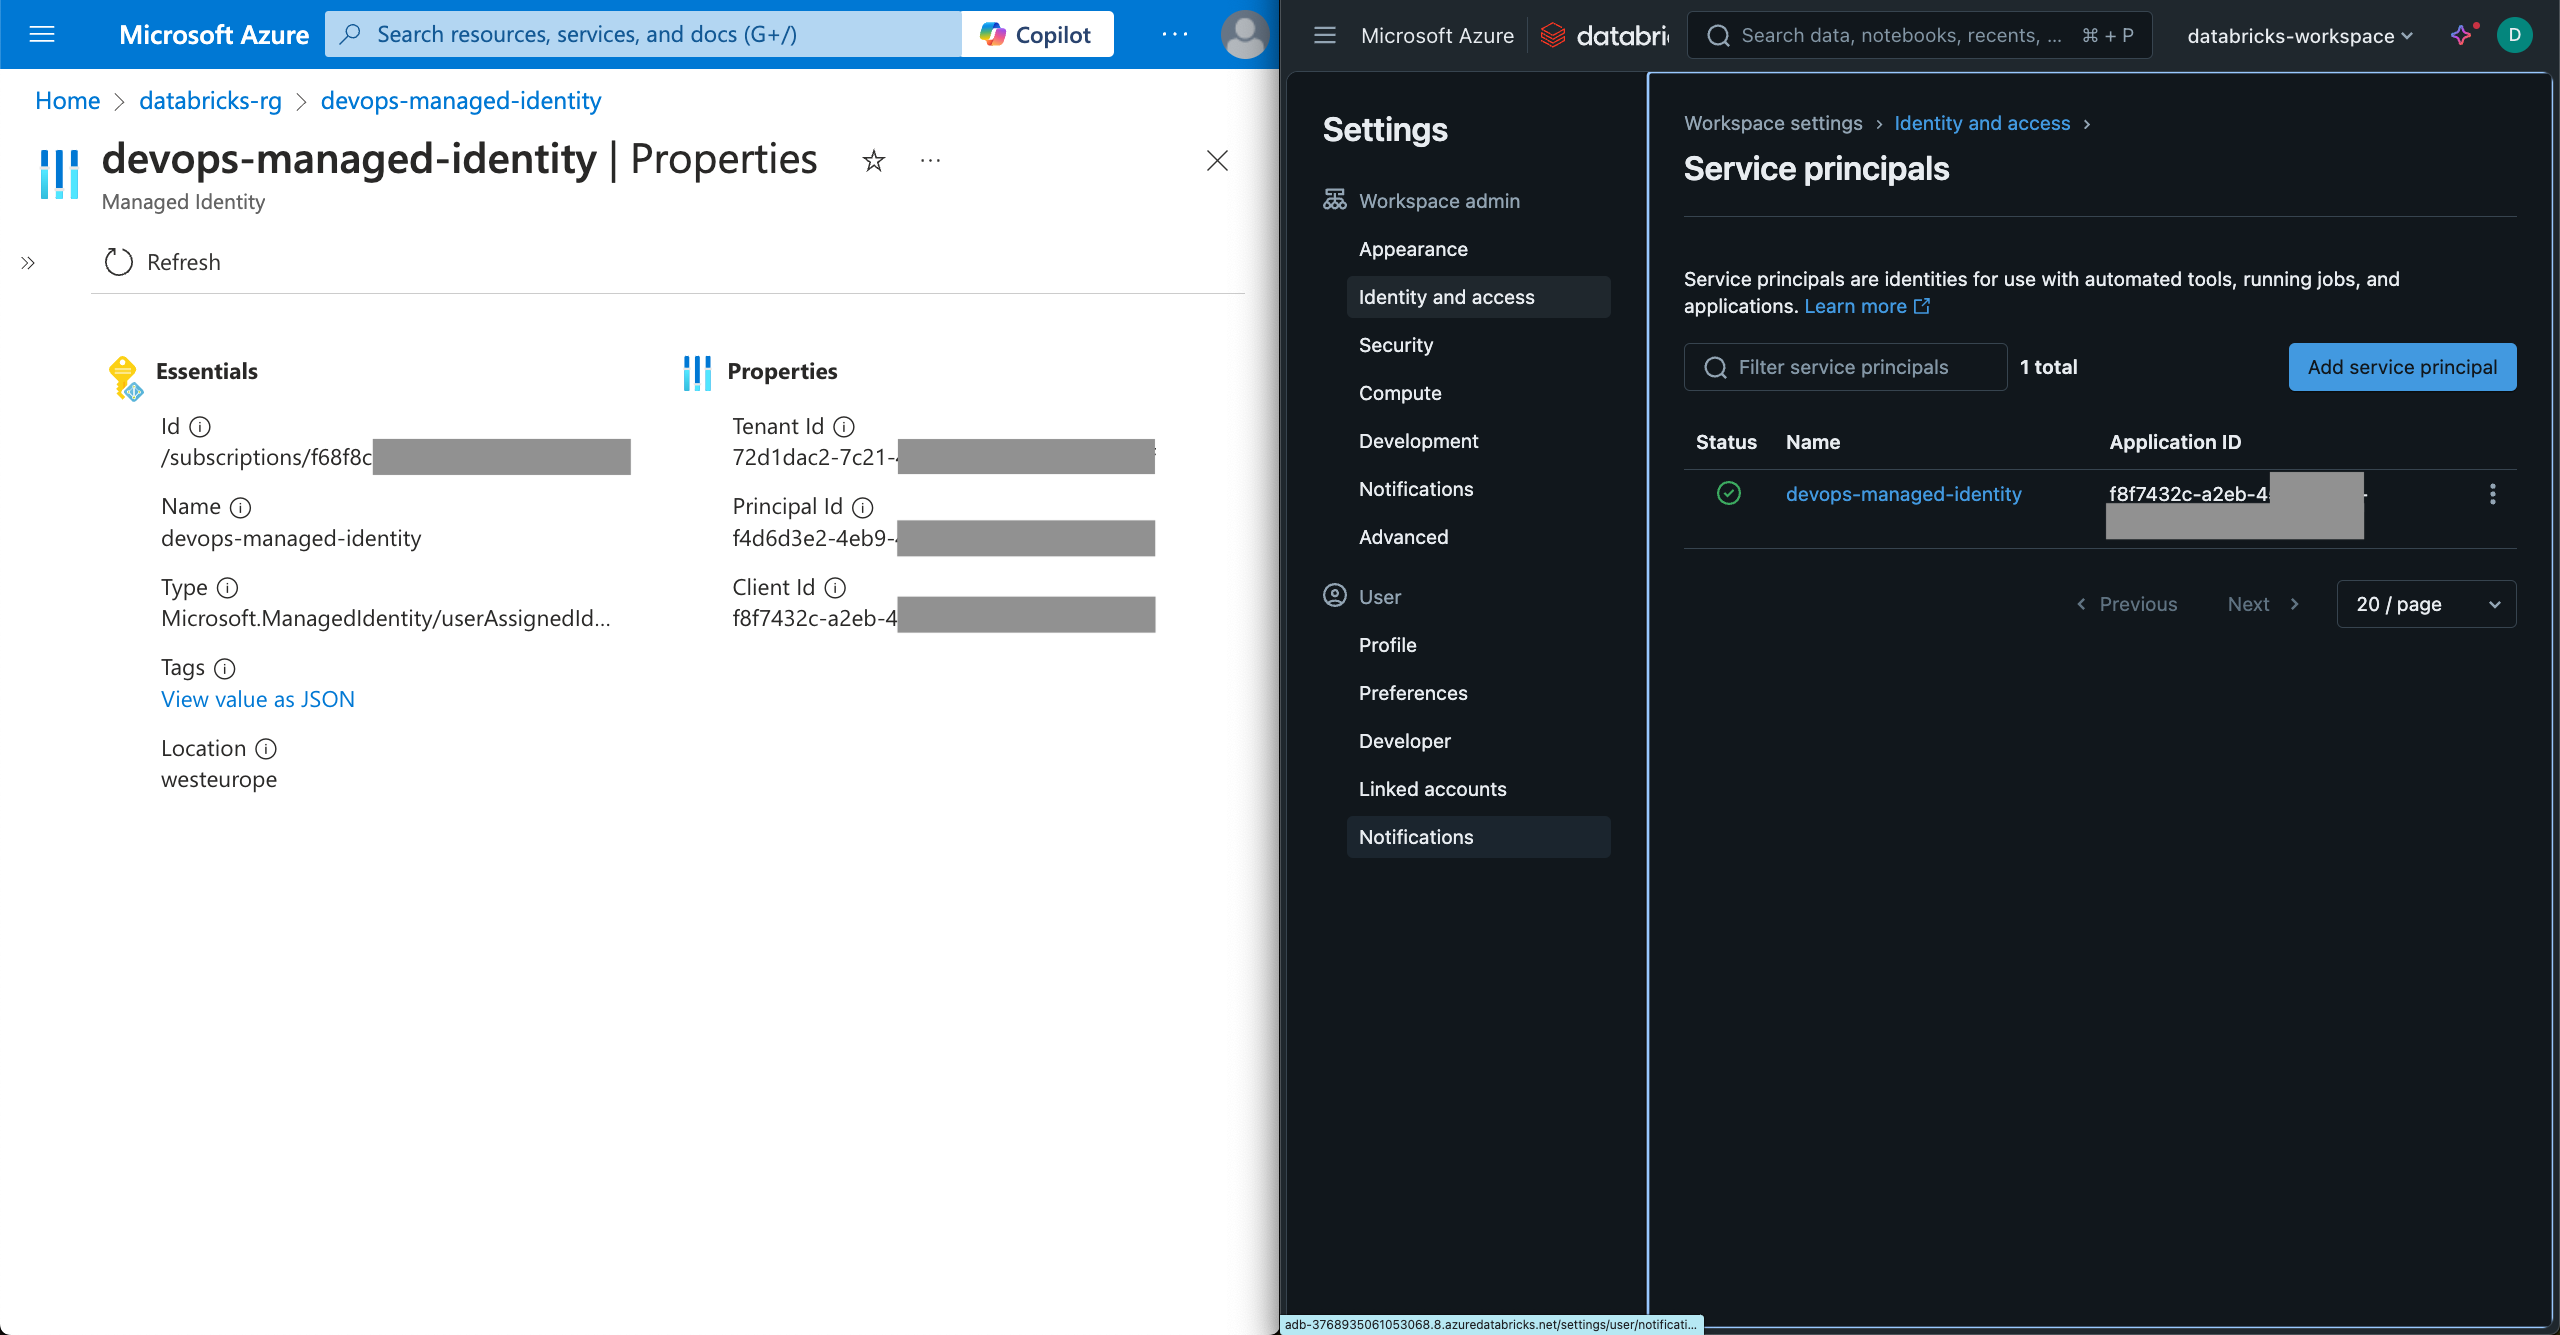
Click on your user icon on the top right corner, and choose Settings > identity and access > Service principals (Manage).
Click the Add service principal button and then Add new button.
Choose the Microsoft Entra ID managed option and fill in the values.
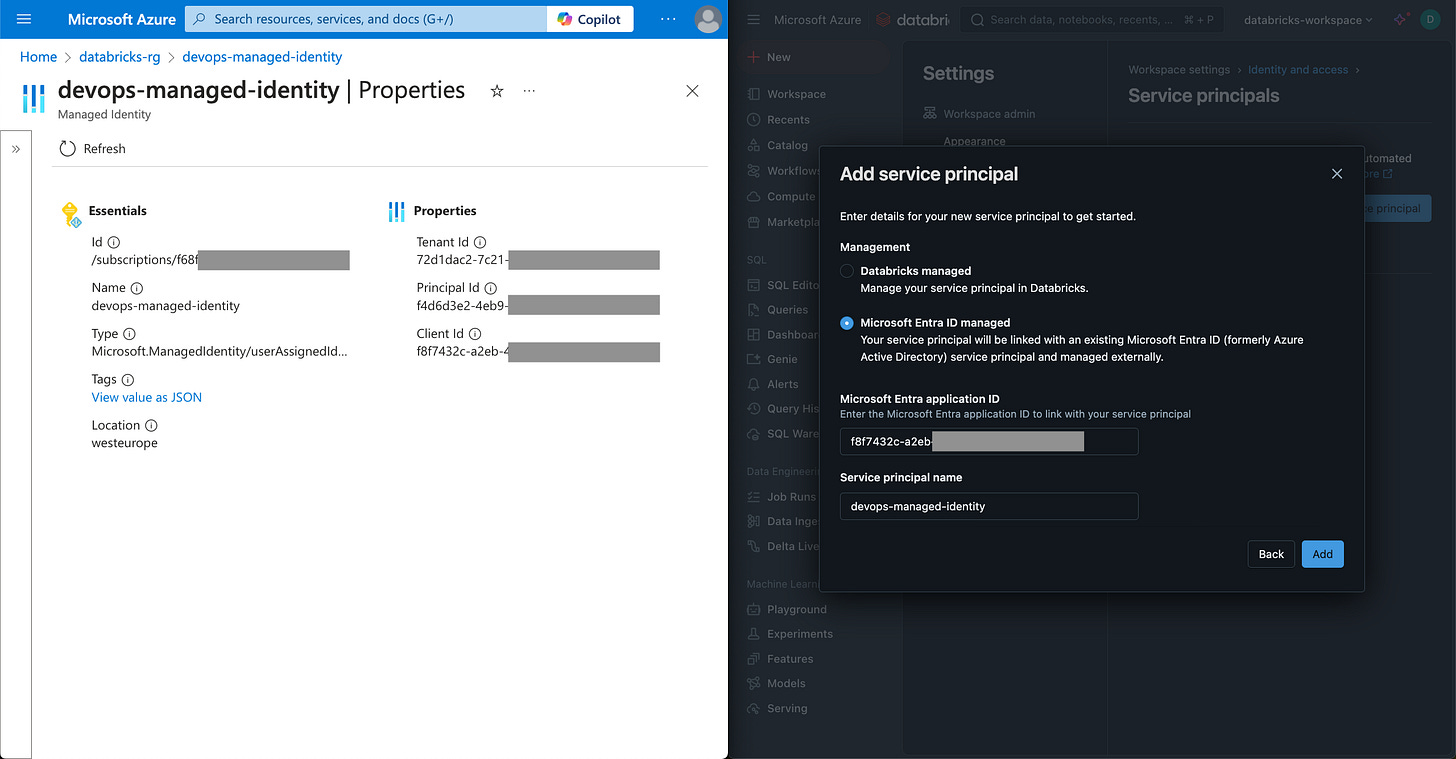
Click the Add button.
How to use the WIF-enabled service connection in your Azure DevOps pipeline
Now that we have laid down the service connection, now I will use it to demonstrate workload identity federation with the following:
A Databricks asset bundle.
An Azure DevOps YAML pipeline.
Use an existing Databricks asset bundle project, or set up a new one.
In this guide, I have a simple Databricks asset bundle project under the /bundle folder. The project has its definition in databricks.yml file and a workflow / job definition in worklow.yml file.
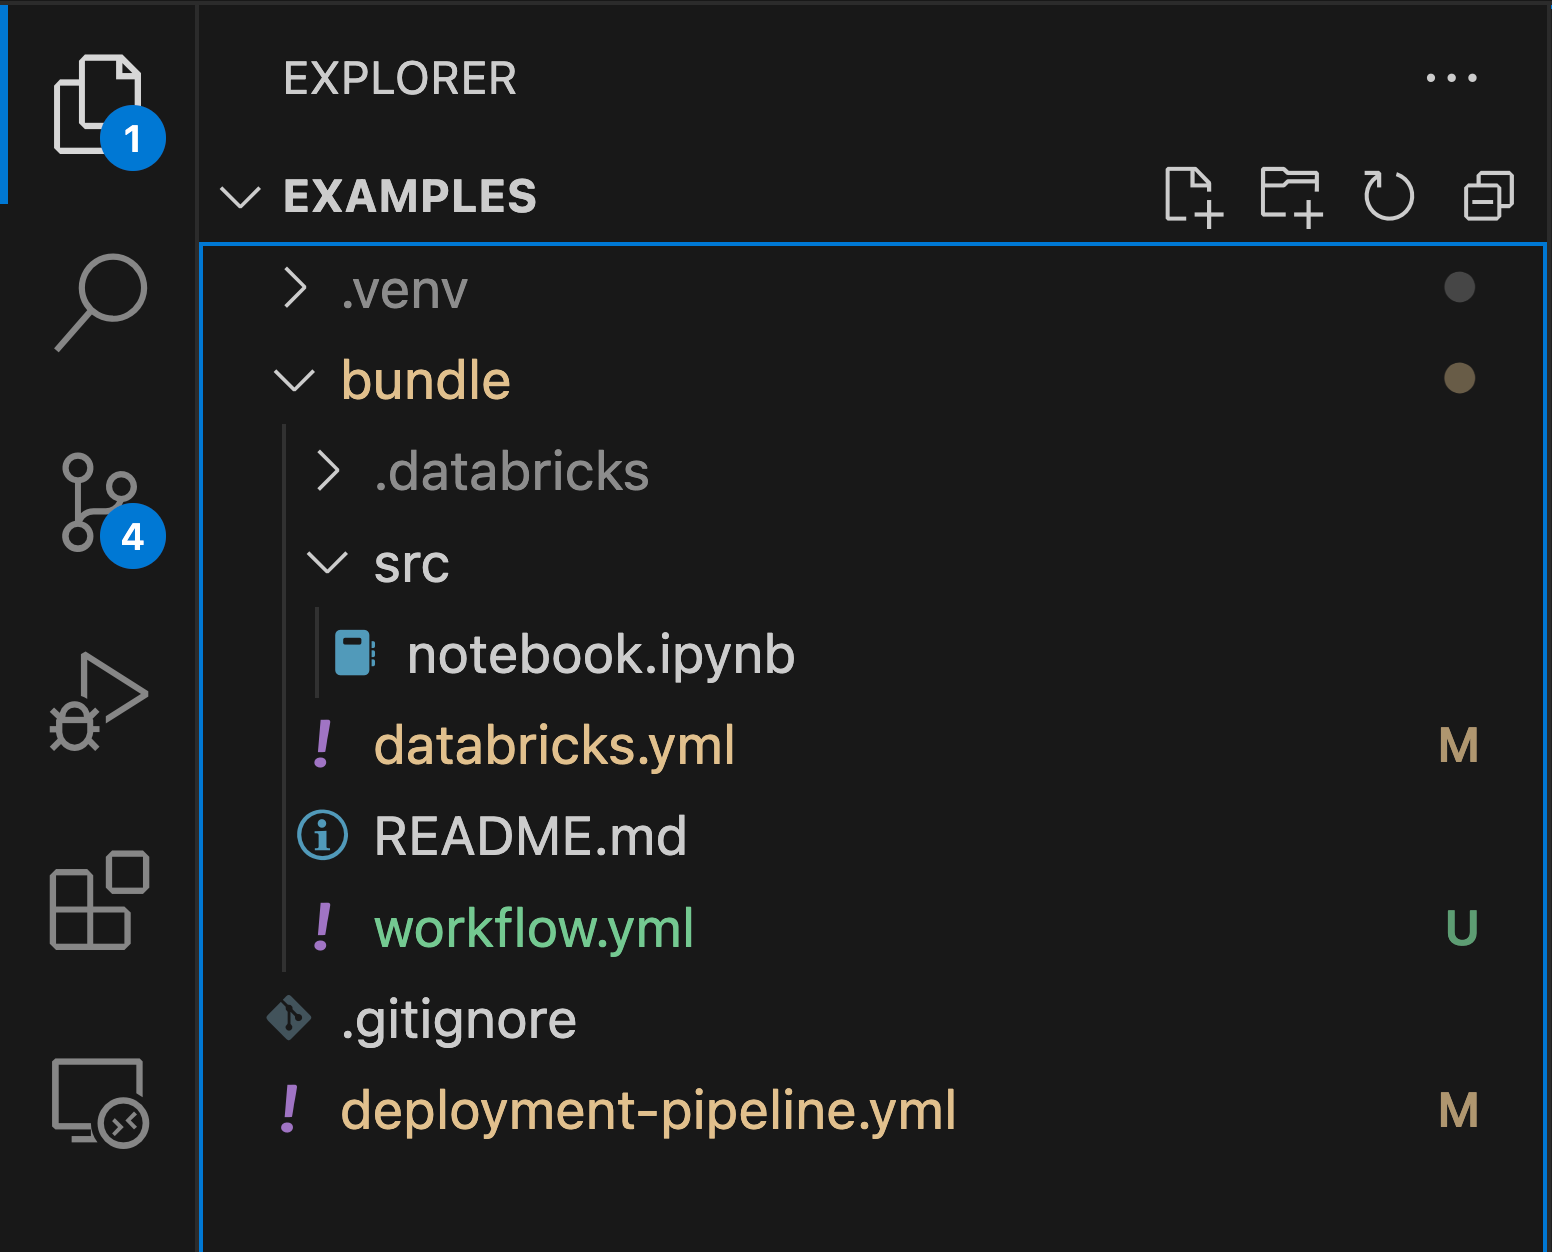
The following code block is the content of the databricks.yml file. What’s important to highlight is that I removed the workspace property. You don’t have to do the same.
In this guide, I want the workspace.host value to be inferred from the Databricks CLI’s DEFAULT authentication configuration profile.
bundle:
  name: example_bundle

include:
  - workflow.yml

targets:
  dev:
    mode: development
    default: true
Use an existing Azure DevOps pipeline or set up a new one.
In this guide, I create a new Azure DevOps pipeline. This simple example pipeline consists of a single task to upload the example Databricks asset bundle.
Here are the important details about the pipeline:
The task is an AzureCLI@2 task.
There’s no Databricks tokens / secrets explicitly retrieved and set for the Databricks CLI authentication. Here, we make Databricks CLI piggyback on Azure CLI for authentication.
Here, the example task uses an environment variable. You can also achieve the same thing by setting a profile.
trigger:
- main
steps:
- task: AzureCLI@2
displayName: 'Databricks Upload'
inputs:
# Replace the following with your service connection name
azureSubscription: ''
scriptType: 'bash'
scriptLocation: 'inlineScript'
inlineScript: |
# For Databricks CLI authn. To avoid hard coding, retrieve the value from a Key Vault or a Variable Group.
export DATABRICKS_HOST=""
echo "Installing Databricks CLI"
curl -fsSL https://raw.githubusercontent.com/databricks/setup-cli/main/install.sh | sh
echo "Deploy bundle"
cd bundle
databricks bundle deploy --target dev
echo "List jobs"
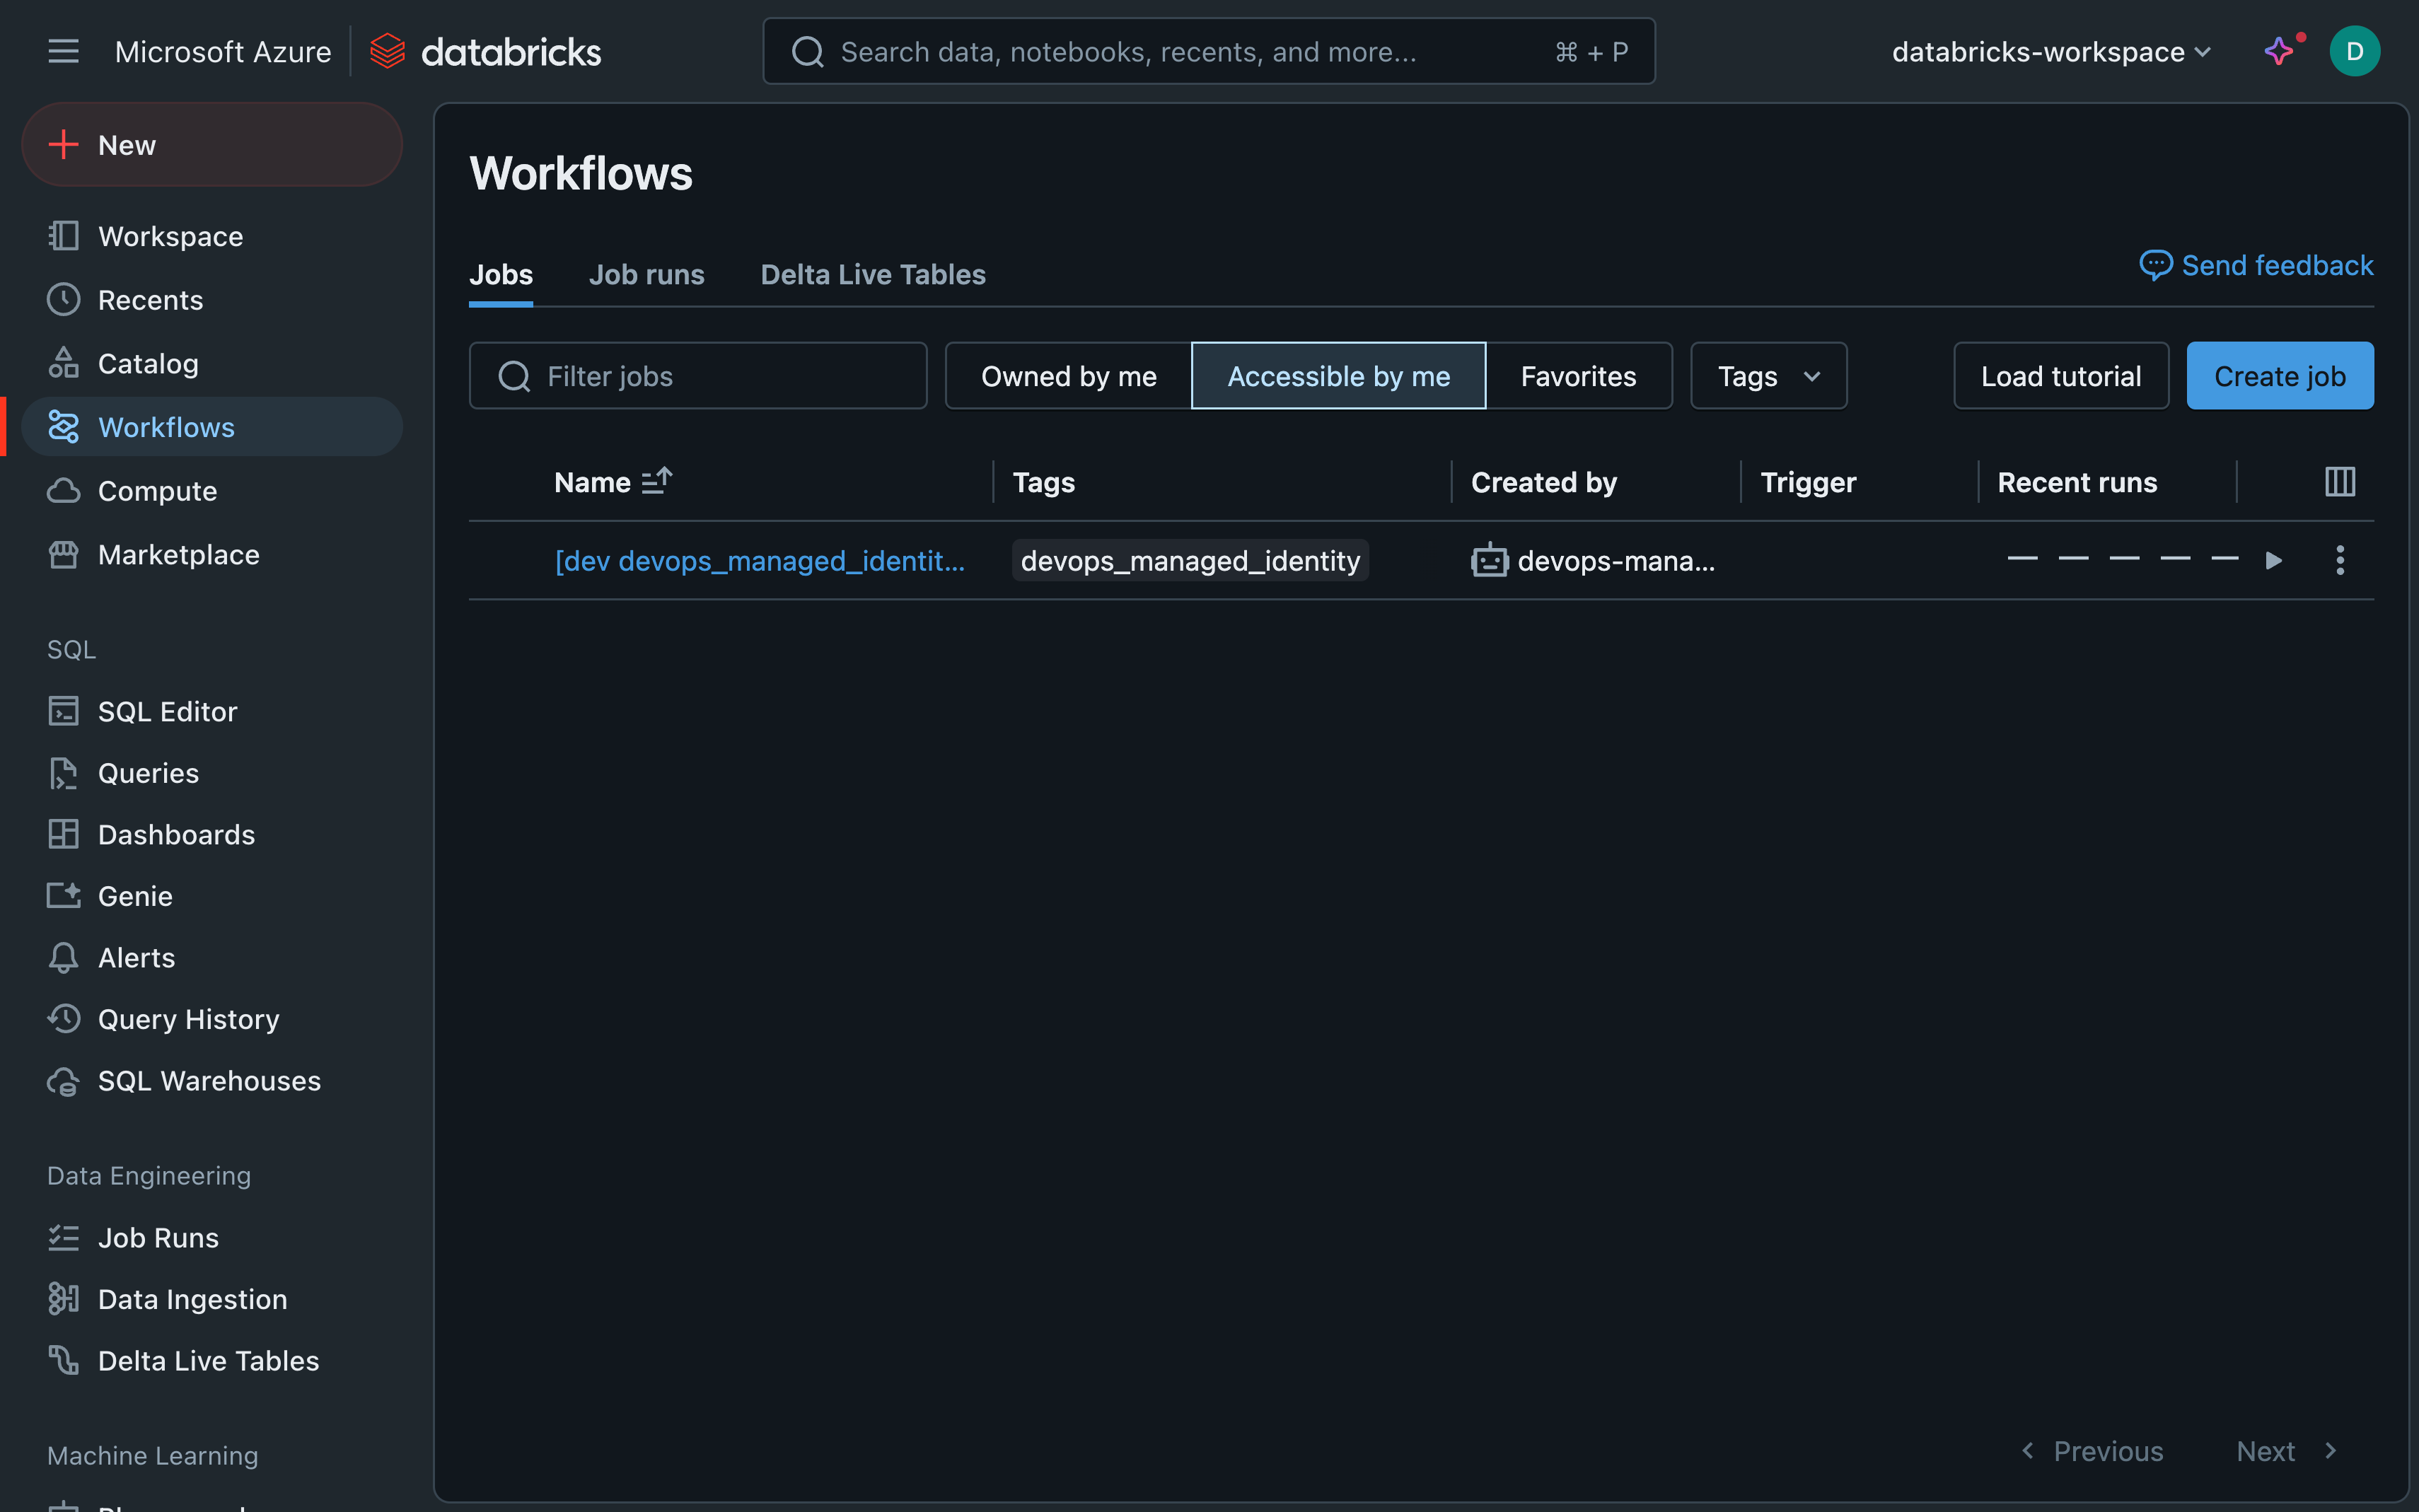
databricks jobs listThe following screenshot shows how the example pipeline above looks like after it runs. See that it deploys successfully.
This is how the deployed job looks like in Databricks. Notice that the job is owned by the managed identity. And I actually like the cute robot icon.
Let me know what you think!
There you have it! I hope that was through, yet easy understand, enough and useful for you.
If you have questions, if I miss any important details, or if this helps you, please do let me know! Writing here is new for me so feedback is greatly appreciated.